How to upgrade your printer to the new Piezography HD MK inks for making stunning black and white inkjet prints
The QTR Black Boost Setting
i1 Profiler Workflow for QuadToneRIP
In Search of the Perfect QTR Profile Part 3: QTR Correction Curve Tool
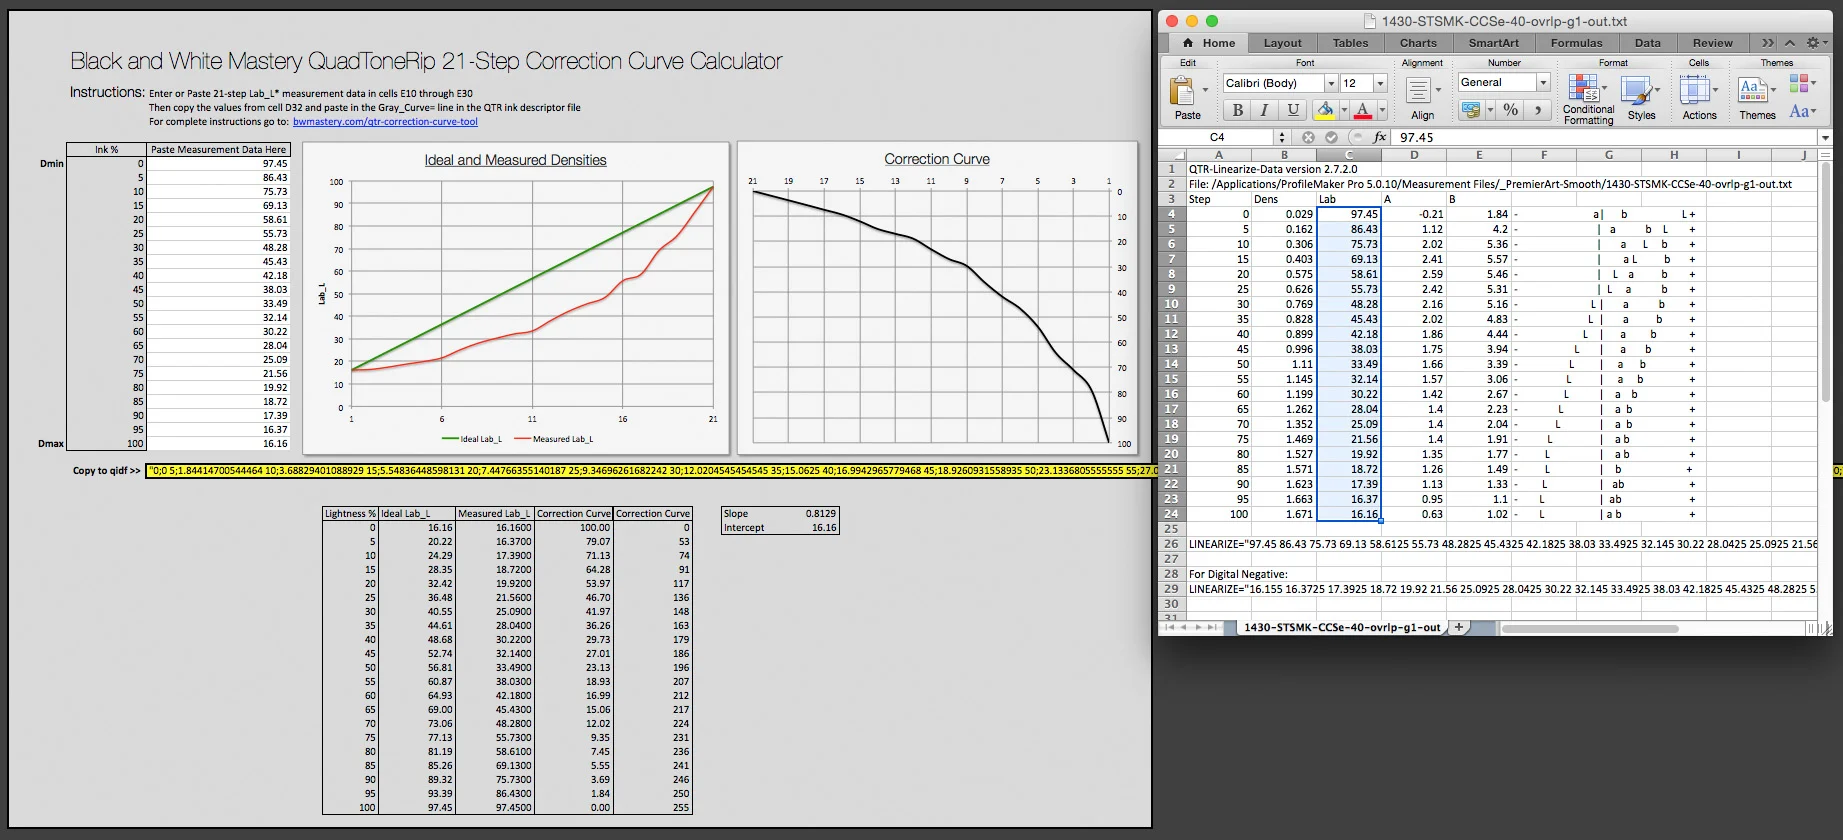
I don't mean for this to become a site dedicated to printing with QuadToneRIP, and I have a few new exciting things waiting in the wings that will be coming out in the next few months. In the mean time, here is a little tool I put together for automatically creating a QTR correction curve based on any 21-step measurement file, and outputs a set of input and output points that can be pasted into the QTR ink descriptor file. This takes the place of the option to embedded a Photoshop .acv curve in the gray_curve= line and eliminates the problem of clobbering your profile if you move or edit the .acv file.
Anyone who has made their own QTR profiles has probably incountered the annoying "Lab values not in order" error when trying to linearize their profile. While this tool might not solve that problem completely, it should produe a profile that will print with a fairly straight-line density increase that should get you through the final linearization steps without any additional problems.
I have not tested this for creating a correction curve for printing inkjet negatives for alternative processes, but it should would for that as well—at least in theory...
The instructions and screenshots below show the steps for aMac, but the process is nearly identical for the Windows QTRgui (or when working with the ink descriptor file in a plain text editor on Windows).
Step-by-Step Instructions
- Print and measure the standard 21-step target with the base raw profile (a profile without any inputs in the gray_curve= or linearize= lines).
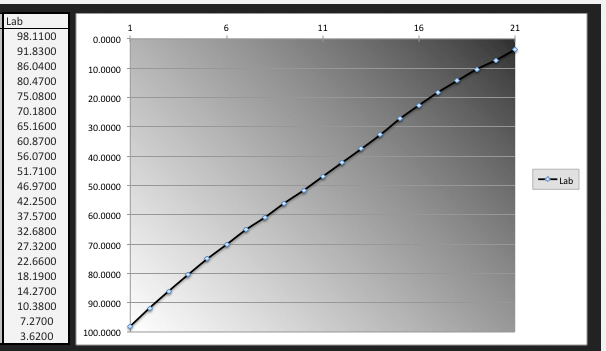
- Run the measurement file through the QTR-Linearize-Data applet to parse the Lab_L data into a nice neat column.
- Select all and copy everything—text graph and all—to your clipboard (cmd/ctrl+a then cmd/ctrl+c)
- Create a new blank Excel workbook and paste the text file data into it.
- Select ONLY the cells with Lab_L Values (all 21 of them)
- Open the BWMASTERY-21-step-QTR-Correction-Curve-Tool Excel template found below and paste the Lab\L measurements into cells E10 through E30 (you can simply select cell E10 and press cmd/ctrl+v to auto fill the rest of the cells)
- Select the highlighted cell E32 and copy and paste it to the Gray_Curve= Line in the ink descriptor file.
- Save the profile with a unique name and then install the profile like normal to create a new set of overlapping QTR curves using this new correction curve.
The resulting profile should print nearly linear and can be fine tuned with the standard linearization process.
The next few screenshots are of the ink graphs from a custom six-shade carbon/selenium blend I made for an upcoming show in August. I intentionally created the raw profile to print much darker and blocked up than I would have normally created it to demonsrate how close the correction curve can get to a QTR linearized profile. There were no reverals in the initial curve so the standard linearization would have worked. Similar to the new Linearize-Quad app Roy Harrington recently released, this tool effectively allows for a two-step linearization process. It might not be right for every situation, but is good to have in the tool box so you can get through profiling and get to printing faster.
CORRECTION CURVE RESULTS
I did a series of controlled tests this morning comparing measurements made from profiles using the standard QTR linearization method to those using the correction curve tool I created. I tested 4 variations of a new custom 6- ink profile using a mixture of Cone Carbon mixed with Cone Selenium shades 2-6 and STS Matte Black as a Shade 1. The same 21x4 measurement file was used to create a QTR linearization and Correction Curve for each of the different variations of the profile to ensure that a errors in the readings were not the cause of any irregularities between the two.
A New i1 Profiler Workflow for the QuadToneRIP 51-step Grayscale Target
Most people use a 21 step (5% step) target for measuring and linearizing their QuadToneRIP profiles. Using the 21x4-random target is a step better, and I described this process in my post last year with instructions for using i1 Profiler to measure the linearization targets. While the 21-step target does a good-enough job with a 3 partition profile, sometimes a 51-step (2% K) target can show you where little bumps might be hiding between those 5% steps.
Problems with Smaller Slices
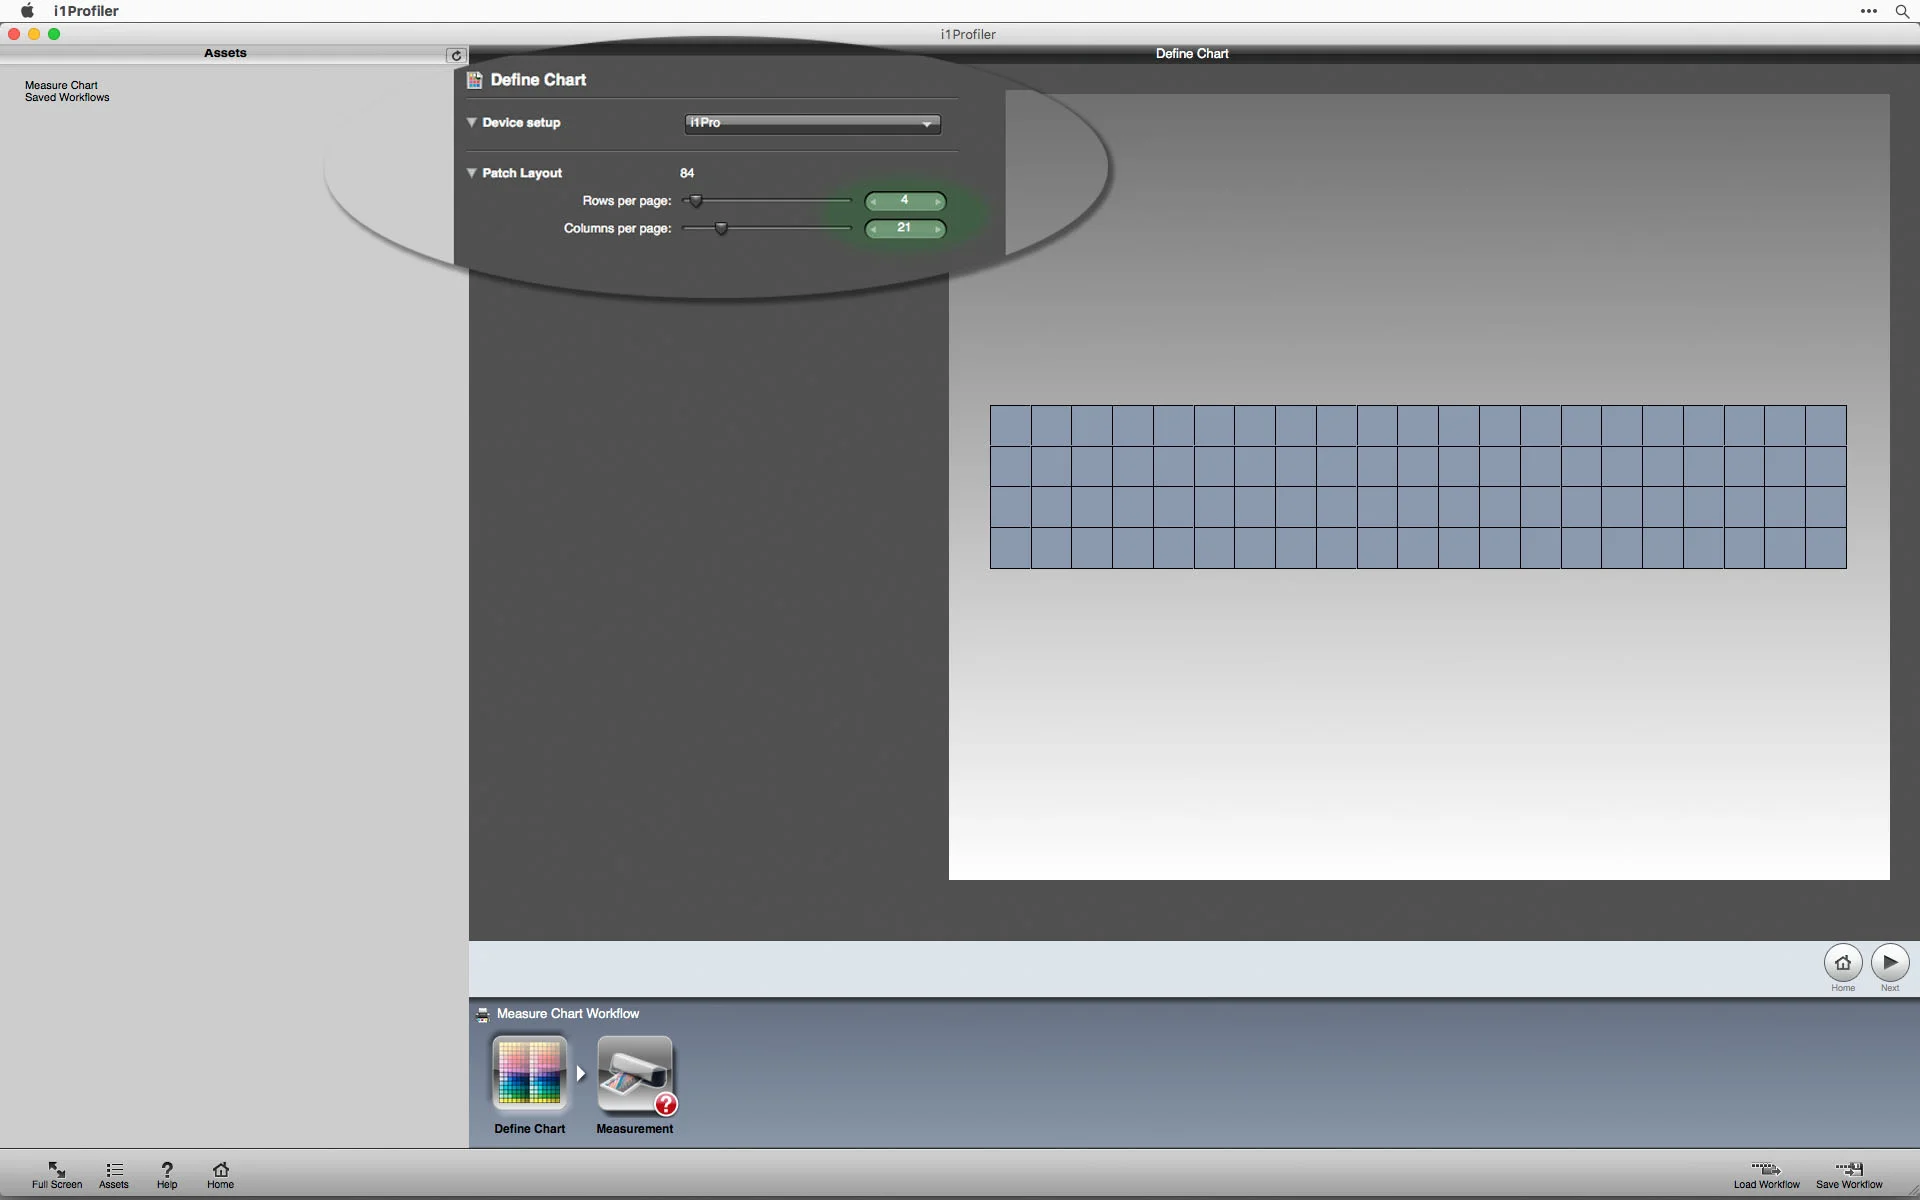
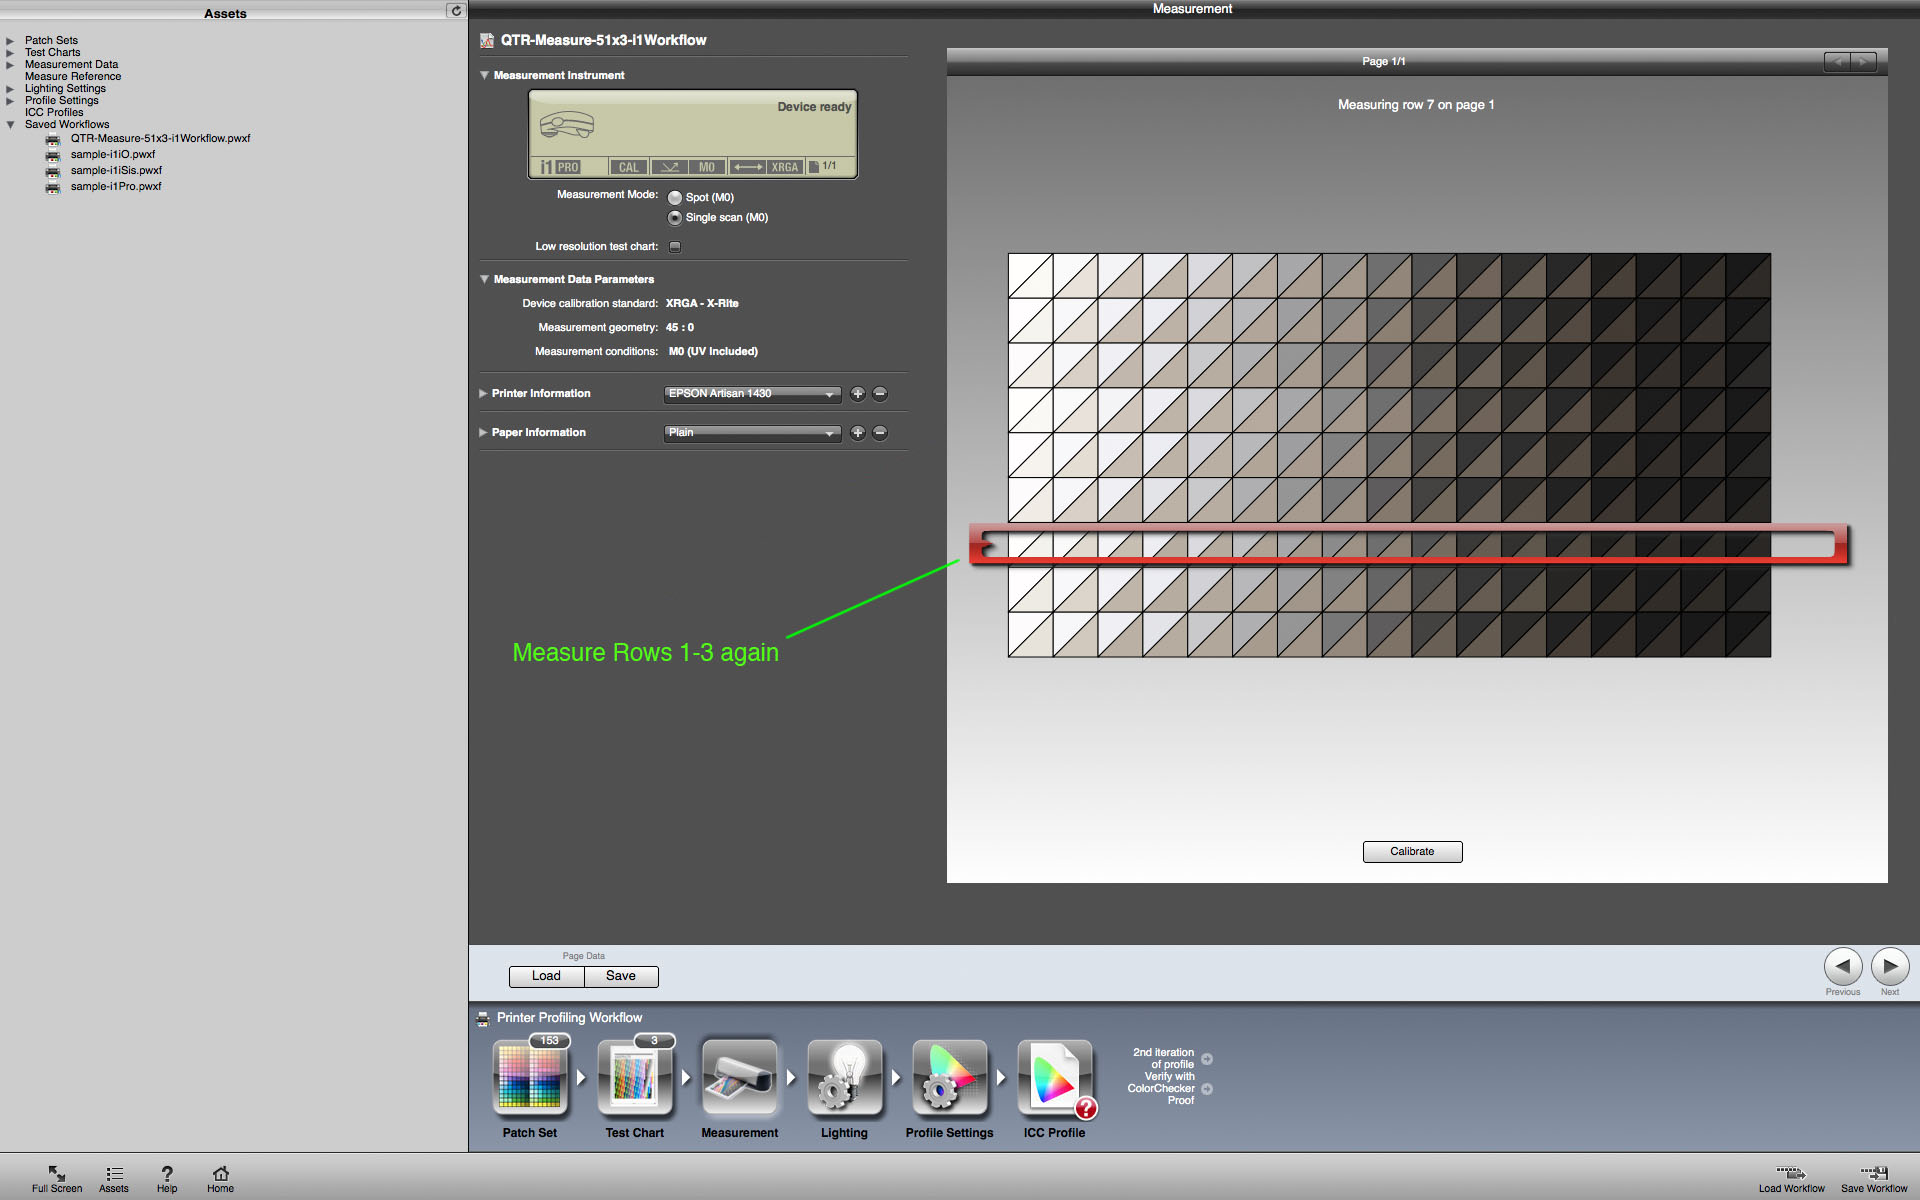
Measure a single patch a few times and you will see that it is usually off each time by a small percentage. Smaller steps will show more information, but can also show bumps in the curve where they might not actually exist. Those measurement errors need to be averaged out to determine if the problem is the actual ink distribution or inconsistencies in how the light reflects off the paper surface as the measuring device moves over each patch. After measuring thousands of patches over the last few years, I have settled on measuring each 51-step target 3 times. A 51x4 might be more accurate, but 9 passes seems to be about the limit of my patience… To make these averaging measurements easier, I have updated the 51-step 2% target included with QuadToneRIP so that it will work with i1 Profiler and the i1 Pro photospectrometer. The workflow allows you to measure the same target three times (measure row 1-3 once, and then go back and measure row 1-3 again when the on-screen instructions indicate measuring row 4-6, and measure it again when the instructions call for rows 7-9).
Detailed Instructions:
i1 Profiler
These instructions and screenshots were created on a Mac, but they are applicable to i1 Profiler for Windows. You will need to download the i1 Profiler from this Dropbox Link.
Print the 51-step target that is included in the downloaded zipfile from the QTRgui on windows or from PrintTool on Mac OSX and make sure to disable color managment. The larger format target that makes reading in strip mode requires you to print it in portrait orientation.
I suggest you create a folder on your desktop for the workflow and any saved measurement files. The default directory or folder for these files is buried in the Application Support folders on the Mac and in the Application Data (which is a hidden folder that can be revealed in the Tools>Folder Options Menu) in the Documents and Settings folder on Windows.
Mac:
Macintosh HD/Library/Application Support/X-Rite/i1Profiler/ColorSpaceRGB/PrinterProfileWorkflows
Windows:
C:\Documents and Settings\All Users\Application Data\X-Rite\i1Profiler\ColorSpaceRGB\PrinterProfileWorkflows
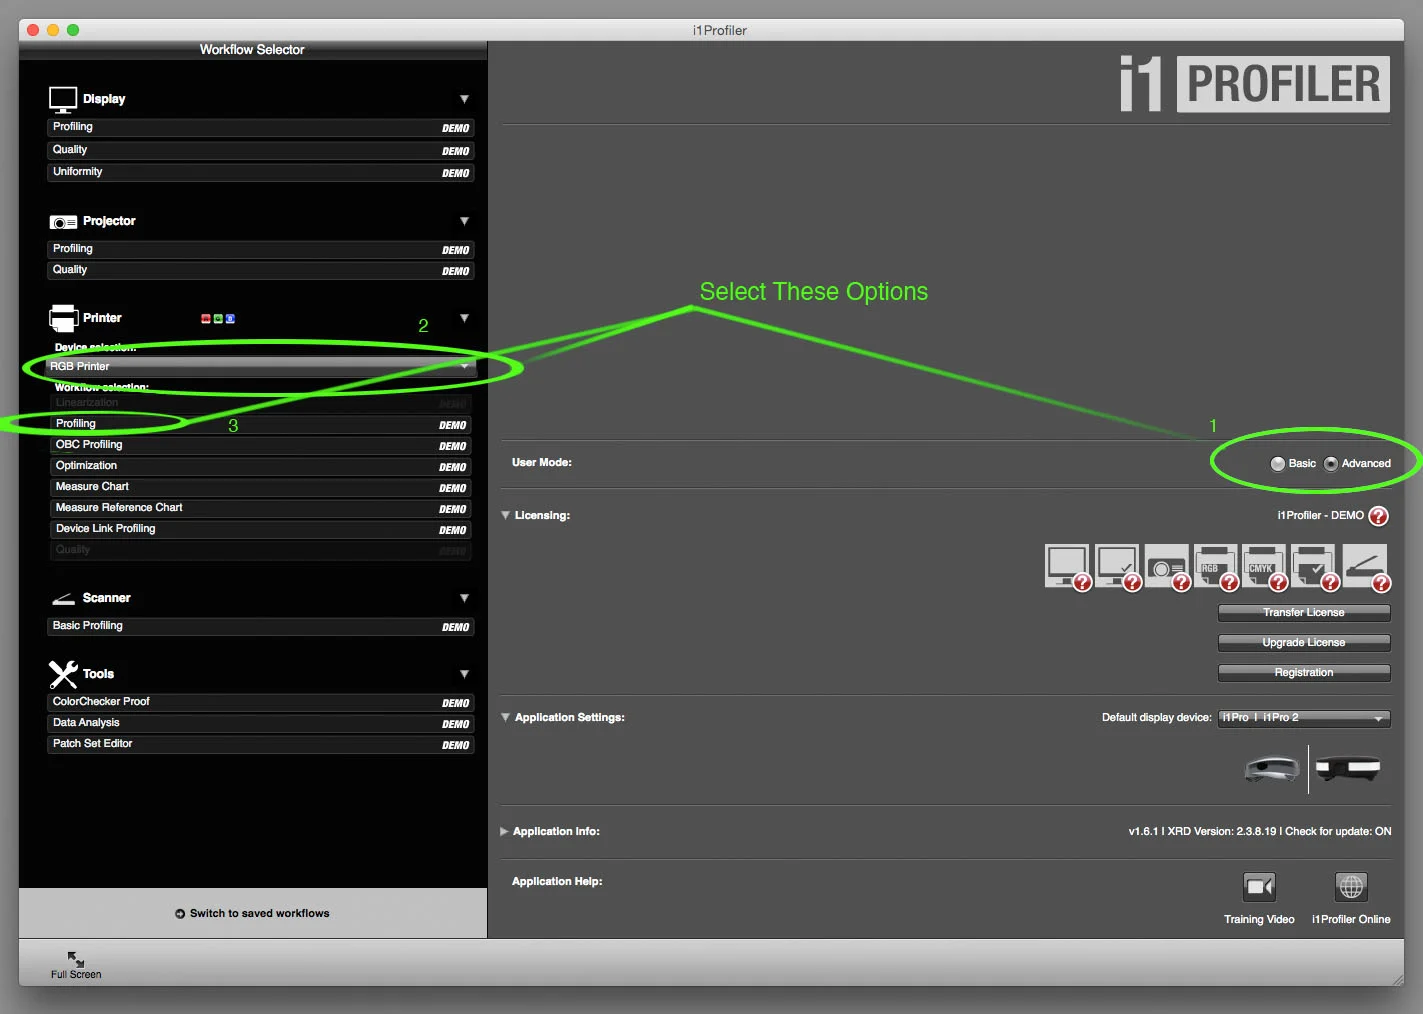
Launch the i1 Profiler Application and make sure you are in Advanced user mode. - Click either RGB or CMYK Printer - Click Profiling (this just gives you access to the next screen where you are able to load the saved workflow) - Alternatively, you can simply click "go to saved workflows" in the lower left portion of the screen.
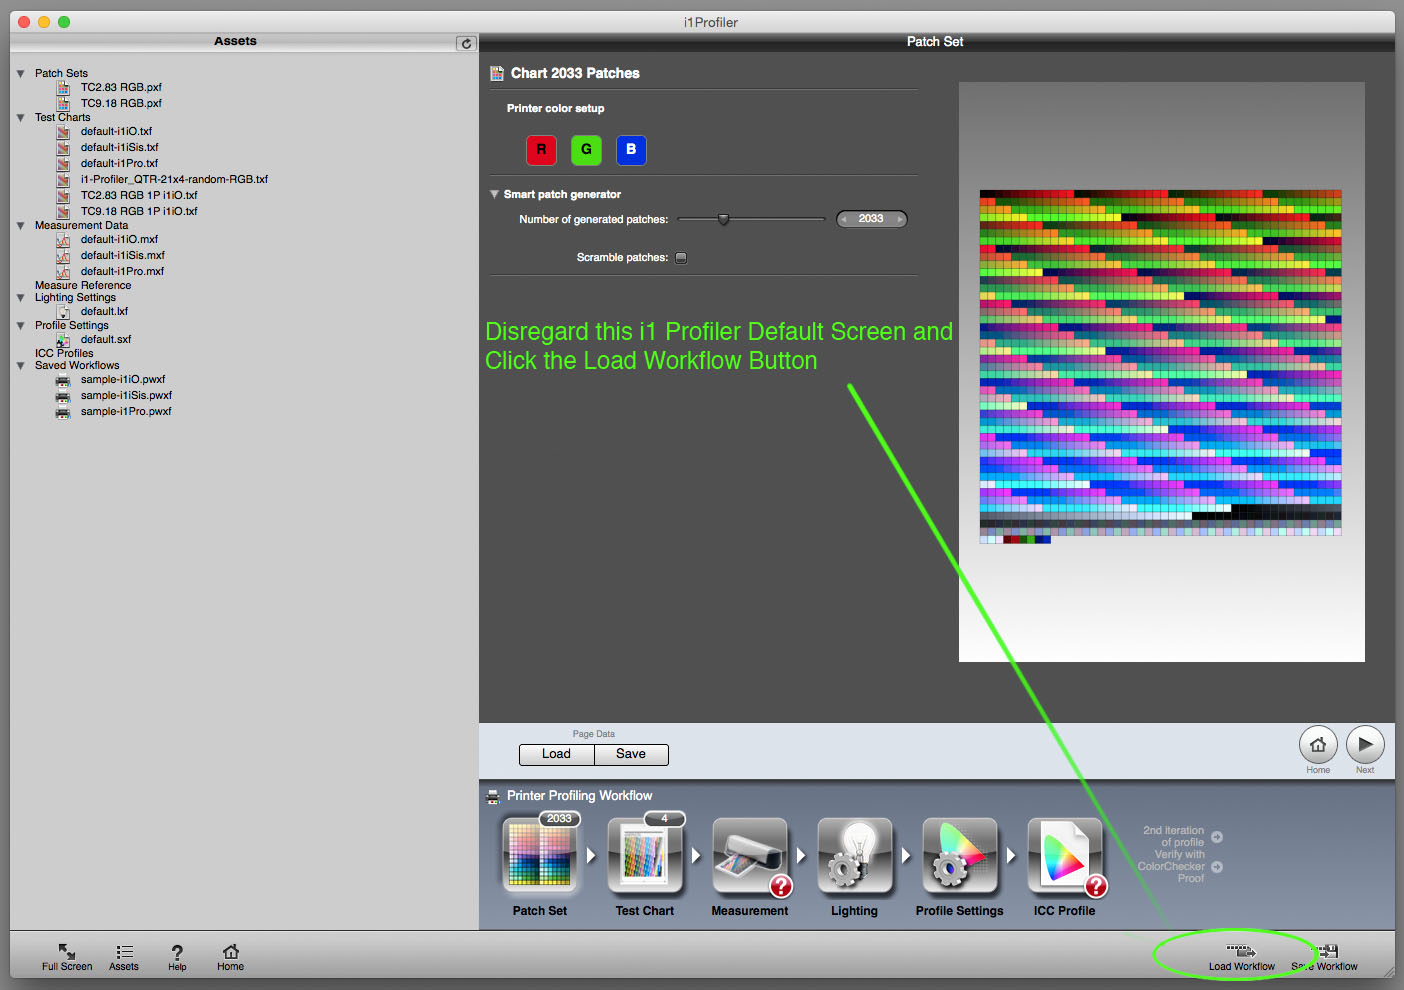
- If you placed the downloaded i1 Profiler workflow in the saved workflow folder, click the name of the workflow in the sidebar under saved workflows. Load Workflow from the bottom right corner of the window.
- This will open the default directory for i1 RGB profiling workflows. Navigate to the downloaded workflow and open.
- It will automatically load the 51x3 reference file, and take you to the chart measurement step.
To measure the chart three times:
- Follow the on-screen instructions for measuring rows 1-3
- When it instructs you to measure rows 4-6, remeasure rows 1-3 again
- Repeat this when instructed to measure rows 7-9
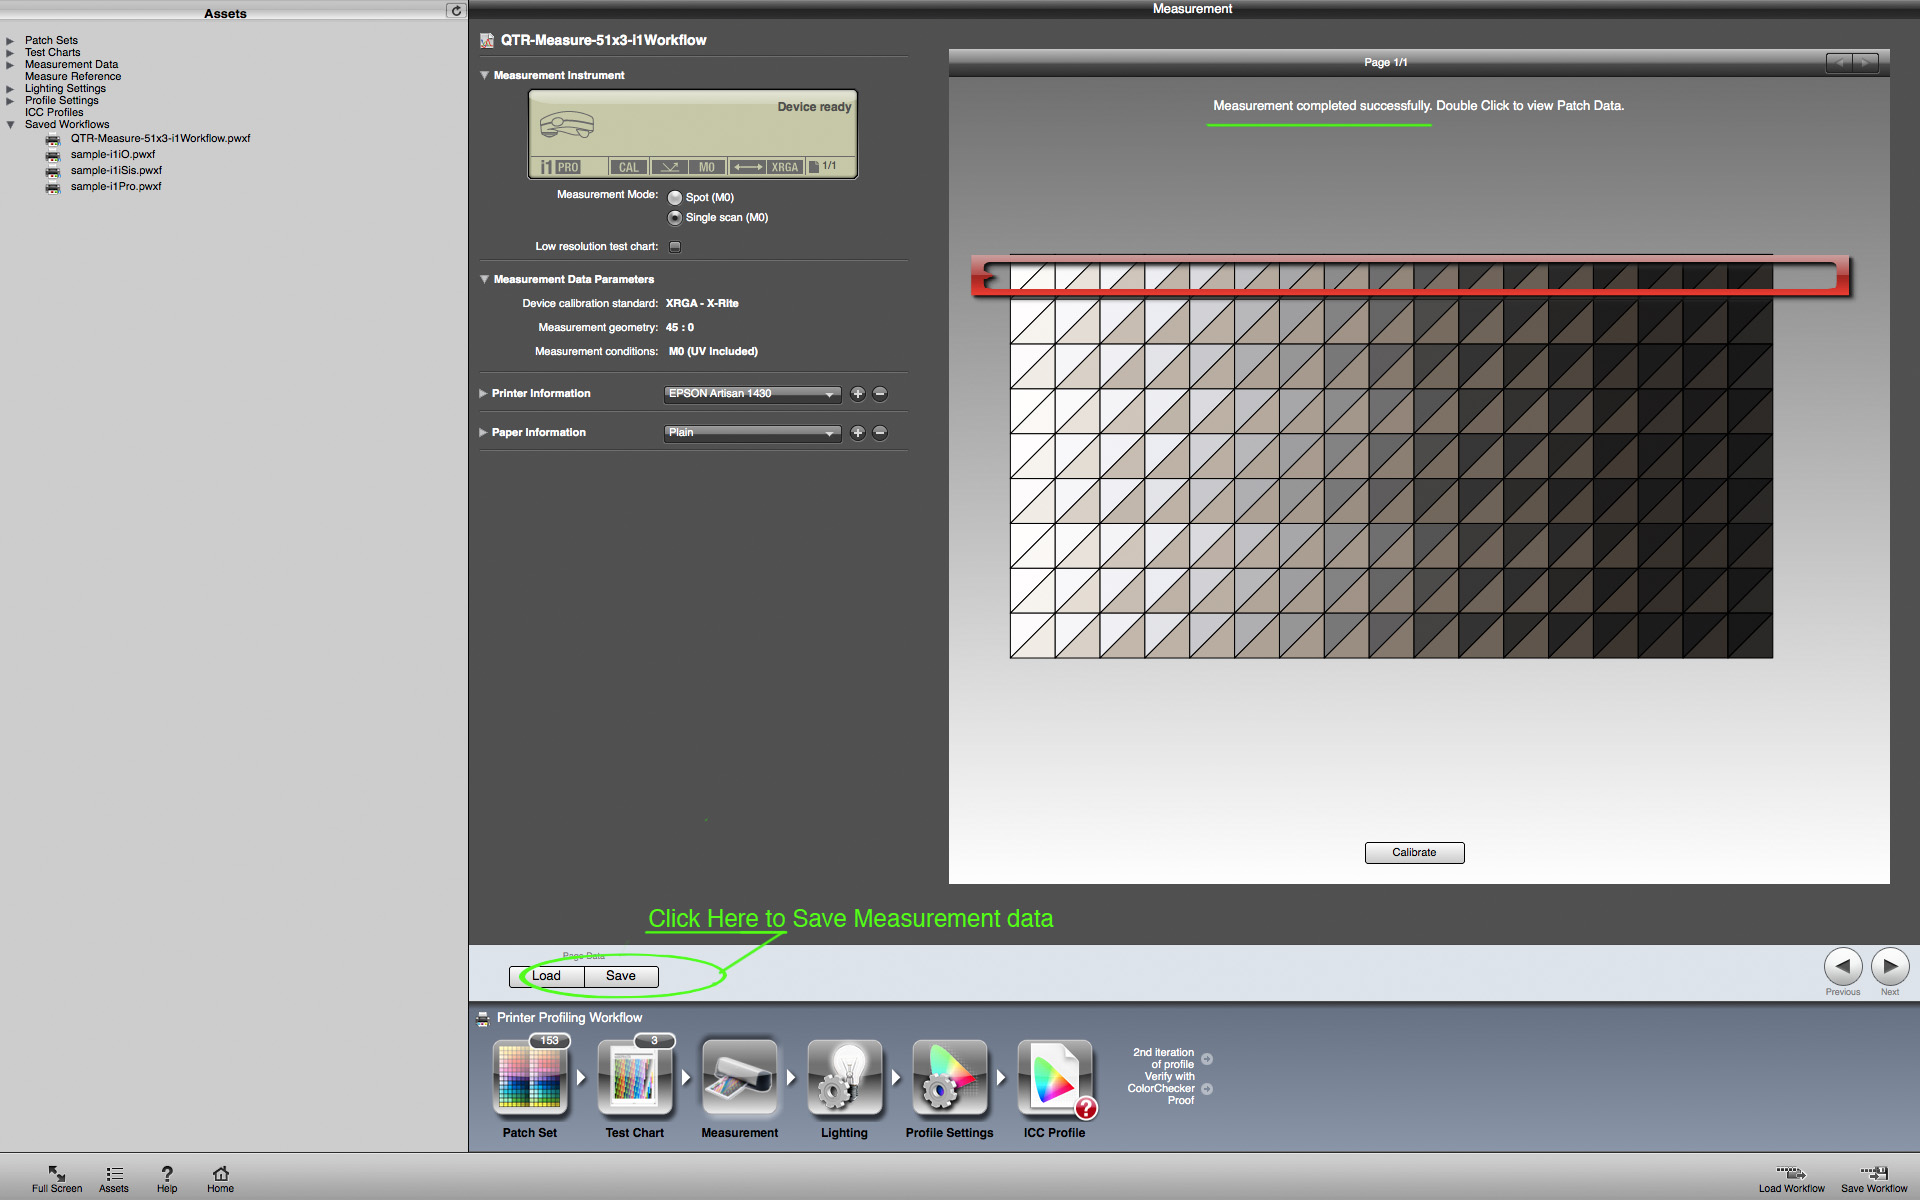
- Save the measurement data under the “Page Data” label
Saving the data in the correct format is essential for the automatic averaging and graphing template to recognize the correct data fields. This is also the correct data format for uploading your measurement file for my QTR Quad file relinearization service.
Create a relevant file name for the paper or the QTR profile/curves used to print the target. I generally suggest using the same name as the QTR or Piezography Profile being measured.
- Choose i1 Profiler CGATS Custom (*.txt) from the drop down menu and navigate to the folder you will use for your measurement files, and click Save.
- This will open a window to choose the custom CGATS file options.
- You will need to check these four fields:
- SampleID
- SampleName
- XYZ
- Lab
See the screenshot that illustrates the data fields to check.
When you click ok to accept it will save the file name you chose followed by “M0” ex: PaperName-ProfileNameM0 Open the file in a text editor to make sure it looks like the illustration below.
Graphing the Measurement Data
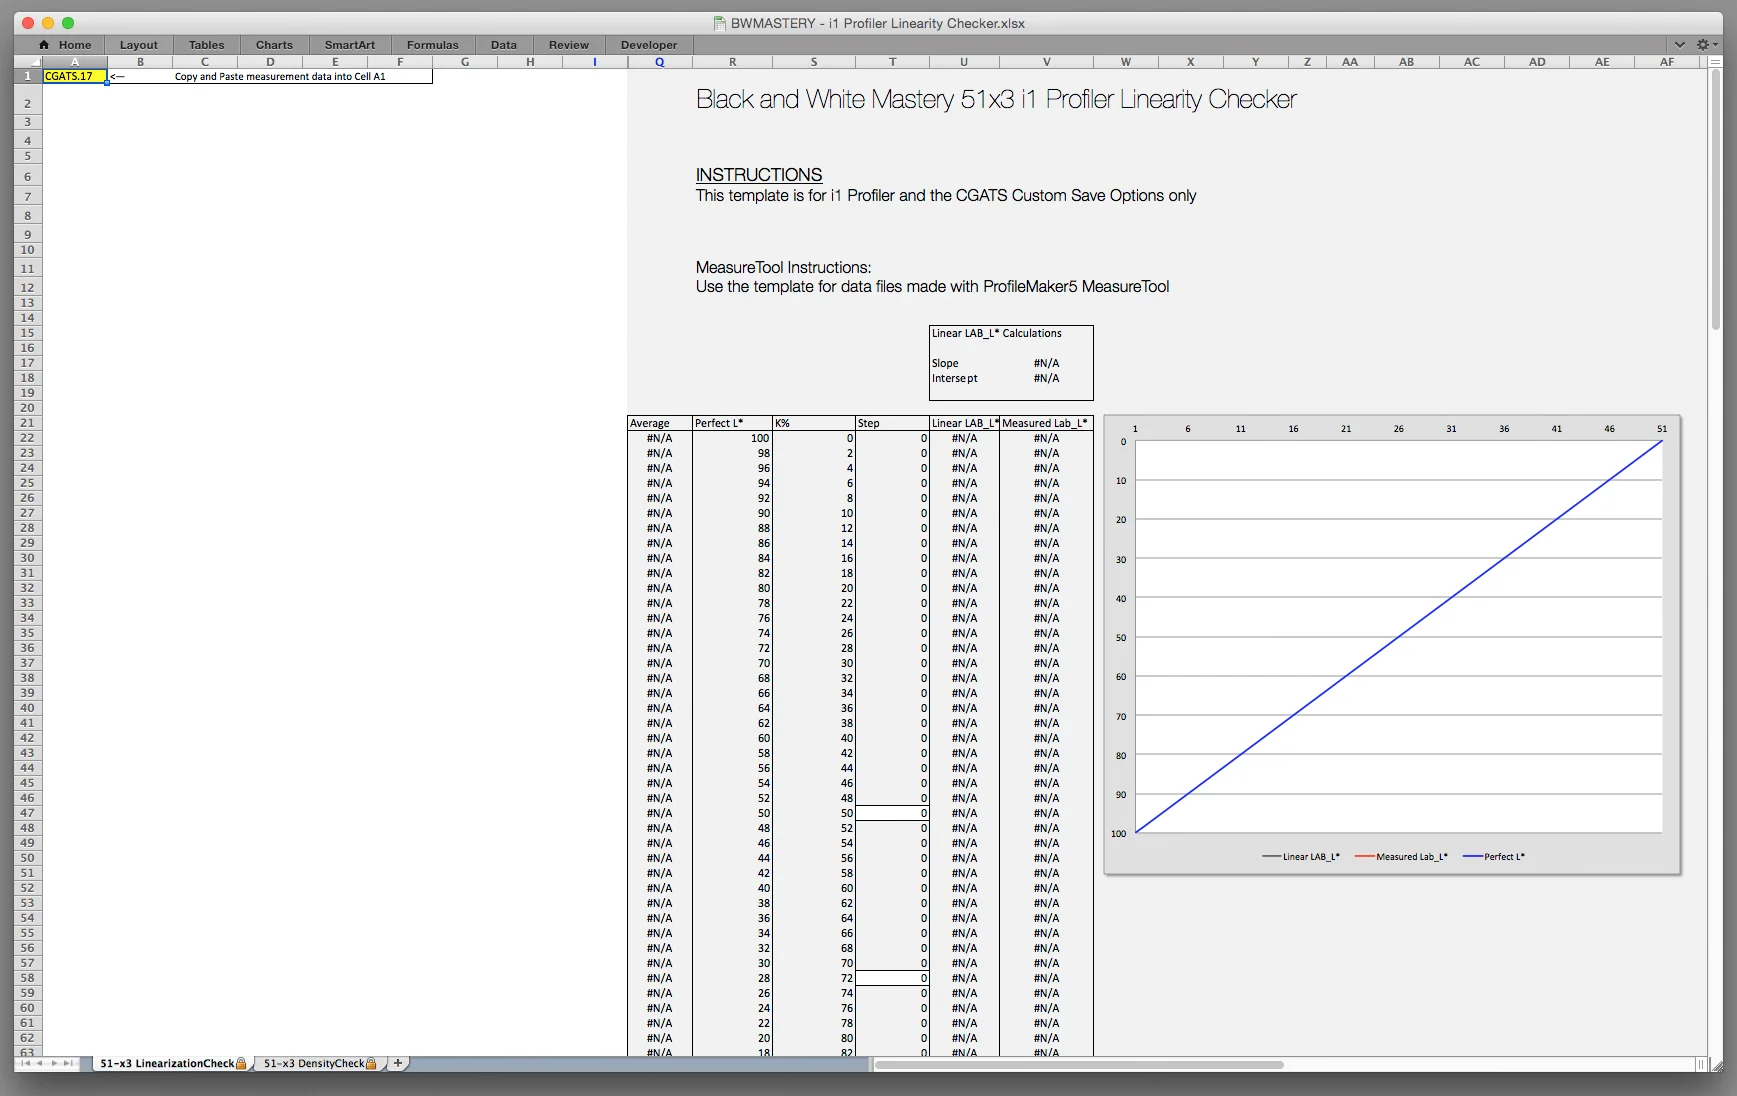
What good is measurement data if you can’t view it? Along with the workflow, I have added an Excel spreadsheet template that does an automatic lookup of the luminosity measurements and then averages and graphs them. The second sheet uses a different lookup to calculate Density from the recorded XYZ_Y measurements.
- Note: There are different template files for i1 Profiler and for the older ProfileMaker5 MeasureTool.
- The template will only work with measurement files saved as detailed in the instructions and screenshots. Incorrectly formatted measurement files will result in incorrect lookups and wonky graphs.
In Search of the Perfect QTR Profile with Multi-Gray Ink Printers
Making profiles for multiply gray dilutions with the traditional QuadTone RIP workflow
I mentioned last year that I was working on a new user guide for creating custom QuadToneRip profiles based on the methods I've been using for the last few years. This simple PDF has taken on a life of its own, and the original idea of a short updated user guide has turned into a full length technical book, and possibly software to make what could be the perfect QTR profile.
This all started more than a year ago when I was asked to write about digital black and white ink jet printing for someone else's book. That project fell through, but it sent me on a year-long journey testing and comparing prints with nearly every possible method.
I still think that the gold standard for most people is Jon Cone's Piezography method, but there are still people who (like me) are on a budget and want to make their own profiles—either to be able to test different papers, different custom ink mixtures, profile problematic equipment, or just because...
Difficulties of a Six-Ink Profile
The Gradient on the right is a profile with incorrectly set cross over points, and no additional overlap. The gradient on the left has correctly set cross over points and 60% overlap.
One of the things that sets Piezography profiles apart from QTR profiles is the unique way Piezography partitions the inks and the shape each of the overlapping ink curves and their long trailing edge. QuadToneRip used a much different way of partitioning the grayscale, and, when using the standard ink limit/partitioning method, the shape of each ink's curve is, for the most part, out of your control*.
*There is a way to define a photoshop ACV curve for each ink, but you lose the ability to control the gray curve with the other settings in the ink descriptor file—that is for another post.
The default QTR curve building algorithm has some overlap as one shade passes to the next, and it works well for a K3 profile, but when more than 4 inks are coming in and out of use so rapidly, any mistake with the cross over settings can cause terrible banding and won't linearize when running the QTR profile installer. The trouble is that no matter how carefully you set the cross over points, the shape of the default curves is very "sharp" and can actually be seen as bumps or as horizontal banding in smooth gradients.
The Often Overlooked Gray_Overlap Setting
To minimize the appearance of those bands or sharp edges in the ink curves, I like a lot more of each ink to overlap to smooth the slope and and elongate overlap with the next darker ink(s). This creates a much more gradual ink distribution, and is similar to Jon Cone’s approach to building Piezography profiles, although the QTR curve creation program makes curves with much different shape. I use a GRAY_OVERLAP setting of at least 50, and have now pretty much settled on 75. The maximum value here is 100, but there seems to be little benefit of a setting that high.
These screen shots illustrate the difference in how increasing the overlap can act to smooth the profile and fill in any noticeable dots as the inks are ramping up and down.
Overcoming the Increase in Density of the Overlap with the Gray_Gamma Setting
Since there is a lot more ink being laid down the increase in dot gain needs to be compensated for by increasing the gray gamma setting in the ink descriptor file. This is essentially a lightness and darkness control similar to the middle slider in the Levels adjustment in Photoshop. A number higher than "1" lightens the print, with a maxiumum value of 10. I usually just set this 1.x with the "x" after the decimal to whatever the overlap is.
Example: if the overlap is 60, then I set the gray gamma to 1.6 (for kozo or other papers where the density increases differently than normal inkjet papers this gamma setting might be 2.2-2.6 for the same overlap setting of 60). That will give the leading edge of each ink curve a much longer and more gradual slope than the default setting of 1.
The Quad Curves in the left hand window have a gray_overlap setting of 75 and gray_gamma setting of 1, are too much "to the left" will print much too dark. The Quad Curves in the right hand window have the same overlap, but a gamma setting of 1.8
Gray Gamma set to 1 on the left will make a print that is far too dark. The profile on the right has a gamma setting of 1.8. This could have been set to 1.9-2.0 for an even straighter initial gray curve.
Near Linear Output Right Out of the Gate
This is an example of a profile I made quickly this afternoon with just two sheets of paper. The luminosity graph is prior to final linearization—just using the built in QTR curve creation program with my system for settings for the ink limits, cross overs and the gray curve. In my book I devote whole section to my approach to setting ink limits—how I determine the optimal density for each shade, and how best to divide up the tonal scale. And another section on how to set the exact cross over point (without using complex math—I've done that for you)
Is all this over kill? Maybe, but the goal is making beautiful prints, and not fighting for days (or weeks) to get a working profile. This is a case where setting things up right to begin with will go a long way to getting a great print as soon as possible.
Is this approach with QuadToneRip as as effective as using the Piezography system? That is open for debate, and it depends on your goals, equipment, materials, and how comfortable you are getting messy with the inks and density measurements. I usually recommend that people just invest Piezography because it is well established and well supported system with a track record and an aesthetic you can trust. But, if you do want to get down into the weeds, I am writing the guide, and it should be ready for your summer vacation.
Comparing Epson ABW and QuadTone RIP
Comparing Cone Piezography Shade 1 and MIS Ebony Shade 1
This post is just an initial demonstration about the differences of the matte black ink between two different third party ink manufacturers' dedicated black and white inksets. This will not explain the differences between the processes of how the inks are used, but only that they are not interchangeable and will require custom profiling depending on which inks are used.
This came up recently on a Yahoo group discussion about the interchangeability of the two different shade 1 inks, and is an further explanation of my comment there. This will not be an explanation of the QuadTone Rip profiling/calibration process so some of what follows might not make sense to those who are not familiar with the QTR profiling and printing process.
The Measurement Process
When I first begin to profile a new paper or inkset, I start by printing and measuring the densities of the separate ink channels. These are printed at 100% so I can see what the maximum ink load the paper is capable of handling, and to see how the paper responds to different inks. One paper might be better with one inkset over an other, and a different paper might respond completely opposite. This in't crucial, but interesting when determining what few papers you might decide to settle on.
I print the ink separation page at 100% of the ink limit, and then immediately measure the chart with an i1 Pro using MeasureTool (Measure Tool is foolproof when measuring charts compared to "smarter" programs like i1 Profiler or ColorPort—I am now making reference files that make this process compatible with currently supported software). When I was testing the drying times of different inks and papers for my upcoming book I would measure every these charts every three hours, but now I measure a chart at as soon as it comes out of the printer and then again about 12 hours later. I might measure again at 24 hours depending on my schedule, but in any case, I've found that after about 12 hours the prints are fully "dry" and the densities will stop shifting one way or another. I haven't yet tested how long it takes in front of a space heater or hair dryer...
The other benefit of making the measurements of the inks at 100% and then keeping the measurement file around is that if you ever have a problem with a paper or inkset you can reprint the target and compare the measurements against the ones used to make the original profile. I keep a separate folder for each paper with all the measurement files on my computer named by paper, inkset, and drying time. That might be overkill for the day to day user, but is helpful for me when writing posts like this too see how one printer does with one inkset of another. Again, I'm not recommending people do this—print the target, let it dry over night and then measure it and you'll be fine. It can be a lot of measuring, and i'm saving my pennies for an automated chart reader...
The Tests
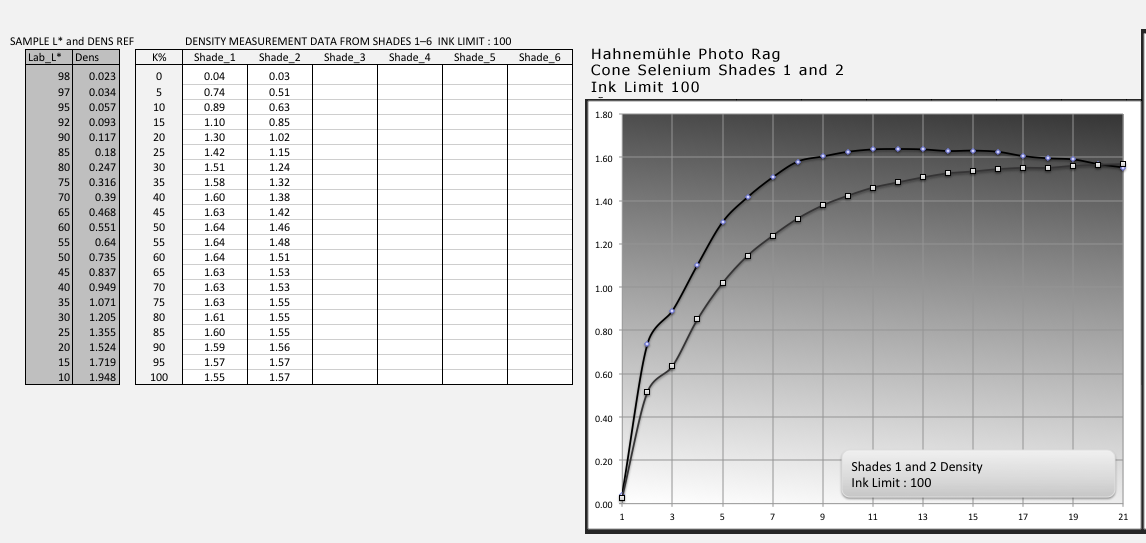
The following screen shots show the difference between shades 1 and 2 for each different ink on two different papers. After measuring the 100% ink limit targets I print the targets again with ink limits set to be evenly distributed between paper white and the D-max. Those are the limits I use to make the QTR profile. The Flat parts of the ink curve is something that I have only found with the Epson 1430 printer, and happens at about the same point for each ink and I suspect it is a function of the dithering algorithm.
One large difference between the two inksets is that the Cone Shade 2 is a darker dilution than the Ebony Shade 2. The other is that the shade 1 in Ebony inkset tends to reach its D-max sooner and then levels off with only a slight decrease in density after the paper is fully saturated. The Cone shade 1 tends to drop off much faster and isn't as forgiving if the ink limit for shade 1 is set too high. A point about setting ink limits for shade 1: I actually don't recommend people set the ink limit for shade 1 at the absolute D-max since it can block up a sooner and give you problems when you go to linearize the gray curve. I set my ink limit to the point before it starts to level off and then use the "BOOST_K=" option set to a point 5-10 points above the K ink limit.
The screen shots below are from my measurements of Canson Rag Photographique and Hahnemühle Photo Rag 188. The graph is part of my spreadsheet template I developed for QTR profile creation, and which will be made available with my upcoming QTR book.


