A Quick and Easy Contrast Boost
I had an email the other day about using Topaz Labs Perfect Black and White, and the "Ansel Adams" settings. This was specific to the Leica M Monochrome, and the how the contrast with the Ansel Adams filter really made an image pop, but completely blocked up others.
When paying attention to the contrast adjustment curve with some of the film emulation settings if Silver Efex you will see that there are a few that deliberately block up (clip) the shadows. I personally believe that in order to have a print with the most depth you don't want to have large areas of tone block up with complete black. While it is true that deepening the black will give you more perceived contrast, it will also make the print feel flat spatially—you want to maintain a smooth transition to the deepest blacks. You might not being able to make out the detail in tones from 90%-100%K, but the deepest shadows will gradually approach D-max, giving the impression of roundness and depth.
So in response to the email about boosting mid-tone contrast without killing the shadows or highlights I suggested one of my most often used methods of quickly boosting the mid-tone separation and overall contrast. This method takes advantage of one of the contrast blend modes in photoshop. I wont go into too much of the math involved that makes Soft Light work, but basically, it makes the darker values darker and the lighter values lighter—and is just a less severe version of the Overlay blend mode.
Here is a quick run down on how to make this work for you.
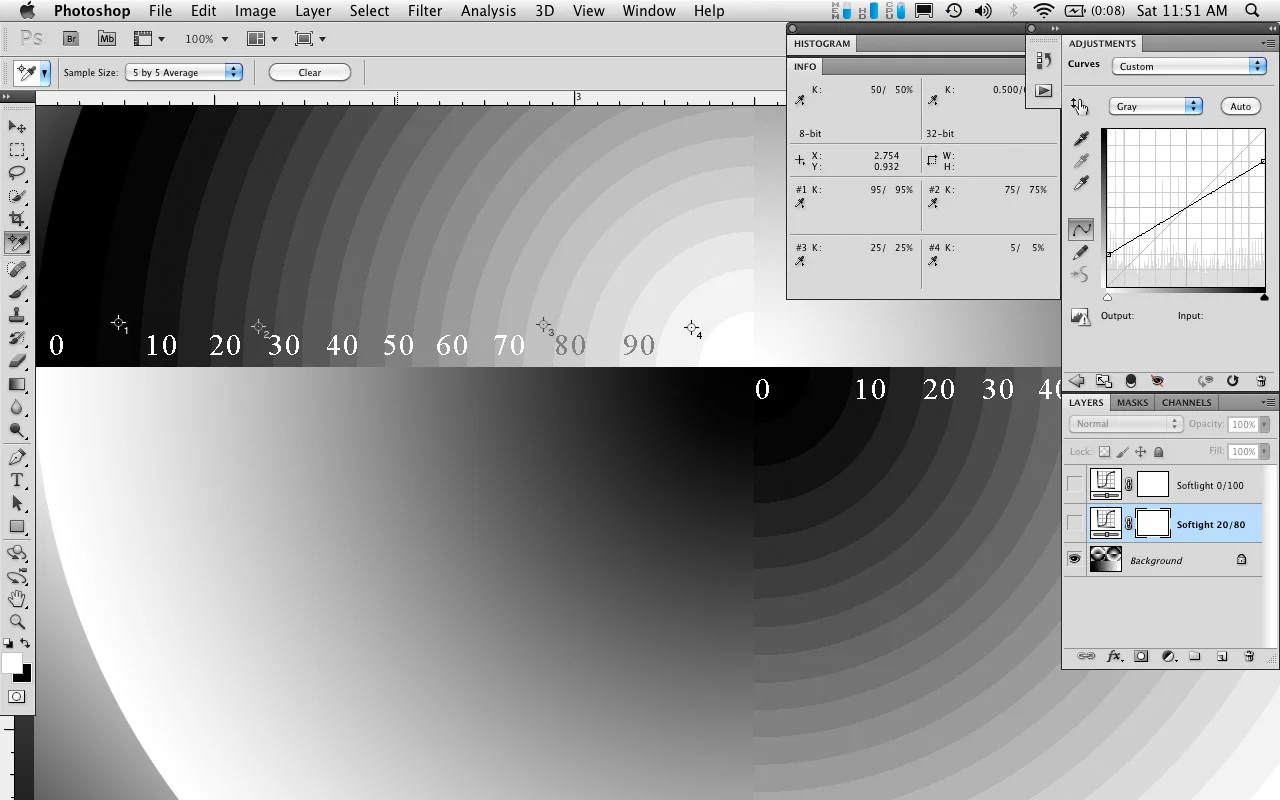
1a: Create a new curves adjustment layer
1b: Set the blending mode to "Soft Light"
2a: Set the black output value and move it to somewhere between 90%-80%
2b: Set the highlight output value to 10%-20%
2c (optional): Adjust the curve if needed, although the idea is to just let the contrast in the soft light formula do the work for you. If the contrast adjustment looks too extreme that is ok, you can adjust for that in the next step.
I usually just use a shadow=80 and highlight=20 rule. This prevents the adjustment from having as much of an effect on the tones between 100-80 and from 0-20.
3) If these is too severe, change the adjustment layer opacity to between 50%-100%
Here are a few examples showing the effect of this adjustment.
Why use this method instead of the brightness/contrast or standard curves adjustment layers? This allows you to quickly use the black and white output levels to control the effect of the soft light adjustment in the extreme ends of the scale while still boosting the midtone separation, and doesn't require you to manually add and adjust curve control points. To me this method gives the feeling of a more organic boost in contrast compared to the Brightness/Contrast method and can be used as a basis for doing more extensive edits and burning and dodging later.


